1. Sacred 介绍
Sacred 是一个 Python 库, 可以帮助研究人员配置、组织、记录和复制实验. 它旨在完成研究人员需要围绕实际实验进行的所有繁琐的日常工作, 以便:
- 跟踪实验的所有参数
- 轻松进行不同设置的实验
- 将单个运行的配置保存在数据库中
- 重现结果
Sacred 通过以下的机制实现上述目标:
Config Scopes(配置范围): 一个通过局部变量的方式非常方便的定义实验参数的模块Config Injection(配置注入): 你可以从任意函数中获取实验参数Command-Line Interface(命令行接口): 你可以获得一个非常强大的命令行接口用于修改参数和运行实验的变体Observers(观察器): 提供了多种观察器来记录实验中所有相关的信息: 依赖、配置、机器和结果, 可以保存到 MongoDB, 文件等.Automatic Seeding(自动种子): 自动设置并保存随机种子以确保实验的可重复性.
一个训练 SVM 的例子:
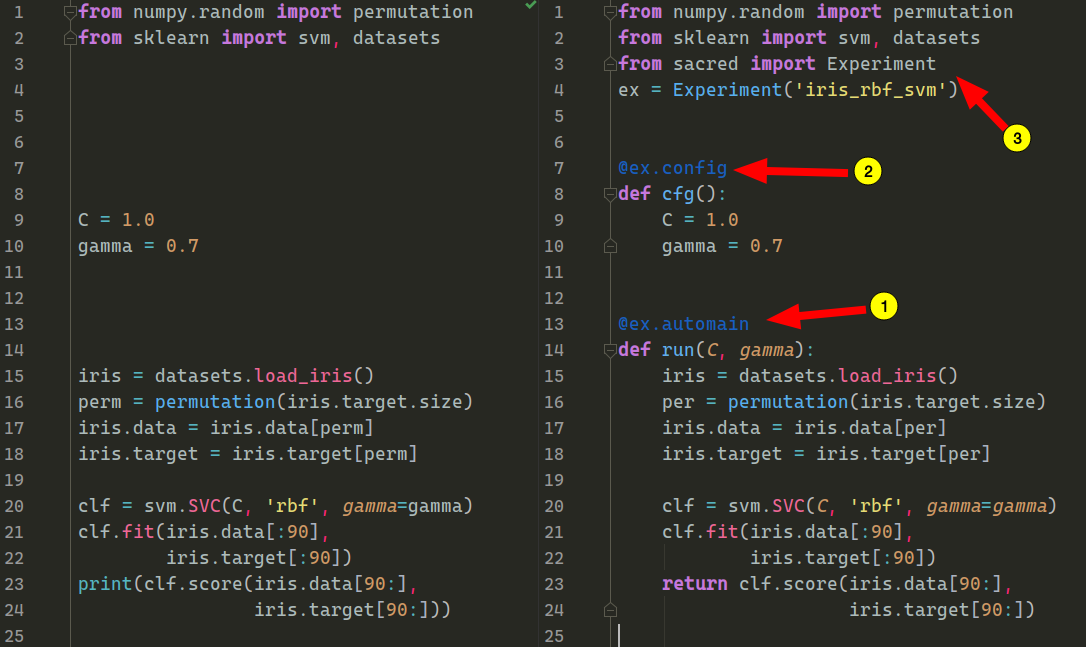
图 1. 在 iris 数据集上训练一个 SVM 和使用 Sacred 的例子
1.1 TL,DR
太长不看版指路: 这个库核心功能已经比较完善, 现在更新频率比较低, 阅读下文时建议只关注以下几个核心功能 (个人使用频率最高, 使用起来最简洁的几个功能)
- 2.2 实验配置(参数)进阶:
ex.config - 2.3.2 命令:
ex.command/ex.main/ex.automain - 2.3 命令行接口进阶
- 2.4.1 捕获标准输出
- 2.5 观察器:
MongoObserver/FileStorageObserver - 2.7 Omniboard 可视化工具
2. Sacred 教程
这一节的内容主要来自于我自己的使用心得结合 Sacred 的官方文档. 因此会以我在做深度学习任务过程中大量使用到的功能为主来介绍.
由于 Sacred 库大量的使用了 Python 的一个高级功能——装饰器. 因此, 我建议不熟悉装饰器用法的读者首先阅读这篇文章 Python 装饰器 .
2.0 快速开始
我们使用图 1 中的 iris 数据集上 SVM 分类的任务快速开始一个 sacred 框架下的实验.
1
2
3
4
5
6
7
8
9
10
11
12
13
14
15
16
17
18
19
20
from numpy.random import permutation
from sklearn import svm, datasets
from sacred import Experiment           # Sacred 相关
ex = Experiment('iris_rbf_svm')         # Sacred 相关

@ex.config          # Sacred 相关
def cfg():
    C = 1.0
    gamma = 0.7

@ex.automain        # Sacred 相关
def run(C, gamma):
    iris = datasets.load_iris()
    per = permutation(iris.target.size)
    iris.data = iris.data[per]
    iris.target = iris.target[per]

    clf = svm.SVC(C, 'rbf', gamma=gamma)
    clf.fit(iris.data[:90], iris.target[:90])
    return clf.score(iris.data[90:], iris.target[90:])  # Sacred 相关
运行上面的脚本, 输出如下:
1
2
3
4
5
WARNING - iris_rbf_svm - No observers have been added to this run
INFO - iris_rbf_svm - Running command 'run'
INFO - iris_rbf_svm - Started
INFO - iris_rbf_svm - Result: 0.9833333333333333
INFO - iris_rbf_svm - Completed after 0:00:00
我们看到代码中没有使用任何的 print 函数时, 该脚本的输出会包含如下几个结果:
- 一个警告: 表示在这次代码运行中没有添加任何观察器(observer)
- 当前运行的命令
run - 开始运行
- 运行的结果
- 运行的时间
我们后面会对这些输出做详细的解释.
2.1 实验概览
2.1.1 创建和运行实验
Experiment 类是 Sacred 框架的核心类. Sacred 是一个辅助实验的框架, 因此在实验代码的最开始, 我们首先要定义一个 Experiment 的实例:
1
2
3
4
5
6
7
from sacred import Experiment

ex = Experiment()

@ex.automain
def train():
    pass
带有装饰器 @ex.automain 的函数 train() 是这个脚本的主入口, 当运行该脚本时, 程序会从 train() 函数进入开始执行.
2.1.2 实验配置(参数)
Sacred 为研究者提供了许多种添加实验配置(参数)的方法, 其中最简单也是最基础的就是定义局部变量的方式:
1
2
3
4
5
6
7
8
9
10
11
@ex.config
def my_config():    # 任意名称
    """ The core configuration. """
    batch_size = 16             # int, batch size of the training
    lr = 0.001                  # float, learning rate
    lr_decay = [1000, 2000]     # list, milestones for learning rate decay
    optimizer = 'adam'          # str, the optimizer of training
    net = {
        "channel": 3,           # int, intial channel of the model
        "layers": 4             # int, number of layers of the model
    }
带有 @ex.config 装饰器的函数中的局部变量会被 Sacred 搜集起来作为参数, 之后可以在任意函数中使用它们. 配置函数中的变量可以是整型, 浮点型, 字符串, 元组, 列表, 字典等可以Json序列化的类型. 并且可以在配置函数中使用之类的逻辑语句如 if...else... 来使得参数之间存在依赖关系. 变量的行内注释会被搜集起来写入变量的帮助文档.
2.1.3 捕获函数
前面提到, 实验中添加的参数可以在任意函数中直接写入参数并调用它们, 看下面的例子:
1
2
3
4
5
6
7
8
9
10
11
12
13
14
15
16
17
18
19
20
21
22
23
from sacred import Experiment
ex = Experiment('exp_name')

@ex.config
def my_config():    # 任意名称
    """ The core configuration. """
    batch_size = 16             # int, batch size of the training
    lr = 0.001                  # float, learning rate
    optimizer = 'adam'          # str, the optimizer of training

@ex.capture
def train(batch_size, optimizer, lr=0.1):
    if optimizer == 'adam':
        optim = torch.optim.Adam(model.parameters(), lr)
    else:
        optim = torch.optim.SGD(model.parameters(), lr)
    # ...

@ex.automain
def main():
    train()                     # 16, 'adam', 0.001
    train(32, 0.01)             # 32, 'adam', 0.01
    train(optimizer='sgd')      # 16, 'sgd', 0.001
现在分析上面这个例子:
- 在第 21 行中, 我们不带参数直接调用了
train()函数. 在执行第 12 行的train()函数时, Sacred 会自动从第 7-9 行的配置中搜索该函数需要的参数并填入. - 在第 22 行中, 我们提供了两个位置参数
32和0.01, 在执行在第 12 行的train()函数时, Sacred 会跳过已经提供的batch_size和lr参数, 自动填入其他未提供的参数. - 在第 23 行中, 我们提供了一个关键字参数
optimizer=sgd, 在执行在第 12 行的train()函数时, Sacred 会跳过已经提供的optimizer参数, 自动填入其他未提供的参数.
2.1.4 观察器
Sacred 会在每次实验中搜集大量的信息, 包括:
- 开始/终止运行时间, 心跳时间
- 使用的配置(参数)
- 返回的结果, 或者发生的任何错误
- 运行实验的设备的信息
- 实验依赖的 Python 包及其对应的版本
- 导入的本地源文件(
*.py) - 使用
ex.open_resource打开的文件 - 使用
ex.add_artifact添加的文件
为了获取这些信息, 我们需要在代码中显式的添加观察器, 如 MongoDB 数据库观察器:
1
2
3
from sacred.observers import MongoObserver

ex.observers.append(MongoObserver())
MongoObserver 是 Sacred 配备的一种观察器, 它可以连接到 MongoDB 数据库, 然后把上面列举的所有信息添加到名称为 exp_name (这是定义 Experiment() 时提供的第一个参数)的数据库中的 runs 集合中. 然后我们就可以通过其他可视化工具连接到数据库并展示实验相关的信息.
2.1.5 实验状态
- 如果我们的实验正在运行, 那么 Sacred 会向观察器添加一个 Running 的状态信息.
- 如果我们的实验正常结束, 那么 Sacred 会向观察器添加一个 Completed 的绿色状态信息.
- 我们可能人为的中断实验或者代码出了问题导致不正常中断. 此时 Sacred 会接管中断过程, 搜集所有的 trackback 的信息并保存到观察器中, 同时会把实验的最终状态设置为 Interrupted (人为中断) 或者 Failed (代码出错, 非正常中断).
- 如果实验运行过程中 Sacred 再也无法连接到 MongoDB, 那么状态会被设置为 Probably Dead
- Timeout (没出现过)
- Queued (没开发完)
2.2 实验配置(参数)进阶
2.2.1 定义参数
Sacred 提供了三种定义配置的方法:
- Config Scope
- 字典
- 配置文件
Config Scopes
Config Scope 是通过装饰器 @ex.config 来实现的, 它在实验运行之前 (即定义阶段) 执行. 装饰器装饰的函数中所有受到赋值的局部变量会被搜集并整合为实验配置. 在函数内部可以使用 python 的任意常用的语句:
1
2
3
4
5
6
7
8
9
10
11
12
13
14
@ex.config
def my_config():
    """This is my demo configuration"""

    a = 10  # some integer

    # a dictionary
    foo = {
        'a_squared': a**2,
        'bar': 'my_string%d' % a
    }
    if a > 8:
        # cool: a dynamic entry
        e = a/2
在定义之后, 实际上你可以直接运行函数以获取这些配置:
1
2
3
my_config()

# {'foo': {'bar': 'my_string10', 'a_squared': 100}, 'a': 10, 'e': 5}
当然了我们也可以使用命令行接口来获取所有的实验配置:
1
python config_demo.py print_config
这个语句中的第一个参数 print_config 是 Sacred 内置的一个命令, 用于打印所有实验参数. 输出结果如下:
1
2
3
4
5
6
7
8
9
10
11
INFO - config_demo - Running command 'print_config'
INFO - config_demo - Started
Configuration (modified, added, typechanged, doc):
  """This is my demo configuration"""
  a = 10                             # some integer
  e = 5.0                            # cool: a dynamic entry
  seed = 954471586                   # the random seed for this experiment
  foo:                               # a dictionary
    a_squared = 100
    bar = 'my_string10'
INFO - config_demo - Completed after 0:00:00
在上面的输出中, 读者可以注意一下 Sacred 是如何在配置中使用函数的 doc-string 和行内注释的, 这可以极大地简化用户定义实验参数的成本. 此外, 还应当注意尽管我们在代码中没有定义 seed 参数, 但 Sacred 给我们定义了, 当然我们也可以自己定义来覆盖该参数.
字典
配置也可以直接使用字典来添加:
1
2
3
4
5
6
7
ex.add_config({
    'foo': 42,
    'bar': 'baz'
})

# 或者
ex.add_config(foo=42, bar='baz')
配置文件
此外, Sacred 还允许用户通过文件来添加配置, 支持 json, pickle 和 yaml 三种格式.
1
2
3
ex.add_config('conf.json')
ex.add_config('conf.pickle')    # 要求配置保存为字典
ex.add_config('conf.yaml')      # 依赖 PyYAML 库
2.2.2 更新参数
再次考虑这个例子:
1
2
3
4
5
6
7
8
9
@ex.config
def my_config():
    a = 10
    foo = {
        'a_squared': a**2,
        'bar': 'my_string%d' % a
    }
    if a > 8:
        e = a/2
Sacred 提供了非常优雅的命令行接口允许用户在运行实验时更新参数:
1
python config_demo.py print_config with a=6
在 Sacred 中运行实验时, 文件名后面的第一个参数为要运行的命令. 待更新的参数跟在 with 参数后面, 并用 <key>=<value> 的格式传入. 输出结果如下:
1
2
3
4
5
6
7
8
9
INFO - config_demo - Running command 'print_config'
INFO - config_demo - Started
Configuration (modified, added, typechanged, doc):
  a = 6                              # some integer
  seed = 681756089                   # the random seed for this experiment
  foo:                               # a dictionary
    a_squared = 36
    bar = 'my_string6'
INFO - config_demo - Completed after 0:00:00
由于我们使用的是 Config Scope 来定义参数, 可以看到参数 a 发生更新的同时依赖于 a 的参数也相应的发生了更新.
此外, 我们也可以修改嵌套的参数, 用 . 来获取元素即可:
1
python config_demo.py print_config with foo.bar=baobab
输出结果为:
1
2
3
4
5
6
7
8
9
10
INFO - config_demo - Running command 'print_config'
INFO - config_demo - Started
Configuration (modified, added, typechanged, doc):
  a = 10                             # some integer
  e = 5.0                            # cool: a dynamic entry
  seed = 294686062                   # the random seed for this experiment
  foo:                               # a dictionary
    a_squared = 100
    bar = 'baobab'
INFO - config_demo - Completed after 0:00:00
为了避免不小心改错参数, Sacred 提供了一定的参数检查机制:
- 修改了参数的类型 -> 警告
- 通过命令行接口增加了新的参数, 同时该参数在某个函数中被捕获 -> 警告
- 通过命令行接口增加了新的参数, 但从未被被函数捕获 -> KeyError
2.2.3 参数组
通过 named_config 可以定义参数组:
1
2
3
4
5
6
7
8
9
10
@ex.config
def cfg():
    a = 10
    b = 3 * a
    c = "foo"

@ex.named_config
def variant1():
    a = 100
    c = "bar"
那么在通过添加 variant1 参数可以更新参数:
1
python named_configs_demo.py with variant1
也可以把参数组保存在配置文件中, 同样的方式引入:
1
python named_configs_demo.py with variant1.json
2.2.4 捕获参数
Sacred 会自动为捕获函数 (captured functions) 注入需要的参数, 捕获函数指的是那些被
@ex.main@ex.automain@ex.capture@ex.command
装饰了的函数, 其中 @ex.capture 是普通的捕获函数装饰器, 具体的例子和参数优先级顺序在 2.1.3 节已经给出, 此处不再赘述.
注意, 捕获函数的参数在实验配置中不存在且也没有传参时会报错.
捕获函数可以获取一些 Sacred 内置的变量:
_config: 所有的参数作为一个字典(只读的)_seed: 一个随机种子_rnd: 一个随机状态_log: 一个 logger_run: 当前实验运行时的 run 对象
前缀的使用:
1
2
3
4
5
6
7
8
9
10
11
@ex.config
def my_config1():
    dataset = {
        'filename': 'foo.txt',
        'path': '/tmp/'
    }

@ex.capture(prefix='dataset')
def print_me(filename, path):  # direct access to entries of the dataset dict
    print("filename =", filename)
    print("path =", path)
2.2.5 钩子
配置的钩子 (hooks) 在初始化阶段执行, 可以在运行任何命令之前更新实验参数:
1
2
3
4
@ex.config_hook
def hook(config, command_name, logger):
    config["a"] = 10
    return config
2.2.6 映射
Sacred 的 _config 默认返回的是一个字典, 调用参数时需要大量的 [""] 符号, 因此我实现了一个映射的功能, 把字典的键值对映射为了成员变量, 可以直接通过 . 来调用. 这个映射支持字典的嵌套映射.
1
2
3
4
5
6
7
8
9
10
11
12
13
14
15
16
class Map(ReadOnlyDict):
    __getattr__ = dict.__getitem__
    __setattr__ = dict.__setitem__
    __delattr__ = dict.__delitem__

    def __init__(self, obj, **kwargs):
        new_dict = {}
        if isinstance(obj, dict):
            for k, v in obj.items():
                if isinstance(v, dict):
                    new_dict[k] = Map(v)
                else:
                    new_dict[k] = v
        else:
            raise TypeError(f"`obj` must be a dict, got {type(obj)}")
        super(Map, self).__init__(new_dict, **kwargs)
使用例子如下:
1
2
3
4
5
6
7
@ex.automain
def train(_config):
    cfg = Map(_config)

    lr = cfg.lr							# lr = cfg["lr"]
    batch_size = cfg.batch_size			# batch_size = cfg["batch_size"]
    channels = cfg.net.channels			# channels = cfg["net"]["channels"]
2.3 命令行接口进阶
2.3.1 实验参数的更新
命令行接口最大的作用就是更新实验参数. 我们已经在 2.2.2 介绍了通过命令行接口更新参数. 这里仅备注一些需要注意的事项.
-
参数的类型: 要注意的是, Linux 中参数都是作为字符串来对待的, 因此在解析参数时遵循如下的准则
- 先给参数加一层引号(不论单双), 已经有引号的不再加
- 然后蜕掉一层引号, 此时如果是数字, 那么就解析为数字, 否则解析为字符串
1
2
3
4
5
6
7
8
9
10
11
12
# 假设参数 a 默认为数字类型
python demo.py with a=1         # a=1
python demo.py with a='1'       # a=1
python demo.py with a='"1"'     # a='1'

# 假设参数 b 默认为字符串类型
python demo.py with b=1         # b=1
python demo.py with b='1'       # b=1
python demo.py with b='"1"'     # b='1'
python demo.py with b=baz       # b='baz'
python demo.py with b='baz'     # b='baz'
python demo.py with b='"baz"'   # b='baz'
-
参数中的空格: 由于 Sacred 是以
<key>=<value>的形式来传参的, 而这样的形式在 Python 程序的传参中是被当做一个字符串参数的, 因此<key>,<value>内部和等号两边都不能显式的出现空格, 可以用字符逃逸或者引号.1 2 3 4
# 下面三种写法是等价的 python demo.py with a=hello\ world # a='hello world' python demo.py with 'a=hello world' # a='hello world' python demo.py with a='hello world' # a='hello world'
-
参数中的括号: 括号是 Linux 中的关键字, 因此使用圆括号时要加引号, 而方括号不是关键字, 所以可以不加.
1
2
3
4
5
6
7
8
9
10
11
12
13
14
# 圆括号
python demo.py with a=(1,2)                 # 报错
python demo.py with a='(1,2)'               # a=[1, 2]
python demo.py with a='(hello,world)'       # a='(hello,world)'
python demo.py with a='("hello","world")'   # a=["hello", "world"]

# 方括号
python demo.py with a=[1,2]                 # a=[1, 2]
python demo.py with a='[1,2]'               # a=[1, 2]
python demo.py with a='[hello,world]'       # a='[hello,world]'
python demo.py with a='["hello","world"]'   # a=["hello", "world"]

# 花括号
python demo.py with a='{"c":1,"d":2}'       # a={"c": 1, "d": 2}
2.3.2 命令
Sacred 内置了一系列命令, 同时用户可以自定义命令. 命令的使用方式如下:
1
2
3
4
5
6
# 内置命令
python demo.py print_config
python demo.py print_config with a=1
# 自定义命令
python demo.py train
python demo.py train with batch_size=16
下面列举内置的命令及其功能.
| 命令 | 说明 |
|---|---|
print_config |
仅打印参数. 对于同时更新了的参数, 会使用三种颜色来标记: 更改的(蓝色), 增加的(绿色), 类型改变的(红色) |
print_dependencies |
打印程序以来, 源文件, git 版本控制 |
save_config |
保存当前参数到文件, 默认保存到 config.json |
print_named_configs |
自定义命令:
1
2
3
4
5
6
@ex.command
def train(_run, _config):
    """
    Training a deep neural network.
    """
    pass
运行命令
1
python demo.py train
查看命令帮助
1
python demo.py help train
输出
1
2
train(_run, _config)
    Training a deep neural network.
可以定义某些辅助函数以避免触发观察器
1
2
3
@ex.command(unobserved=True)
def helper(name):
    print('Running this command will not result in a DB entry!')
2.3.3 Flag
-h,--help: 等价于使用 help 命令查看用法-c COMMENT,--comment COMMENT: 为当前的运行添加注释-l LEVEL,--loglevel LEVEL: 控制打印的级别-d,--debug: 不过滤堆栈跟踪-u,--unobserved: 不使用观察器-p,--print_config: (运行之前)打印参数-m DB,--mongo_db DB: 添加 MongoDB 观察器-n NAME,--name NAME: 为这次实验设置名称- 自定义 Flags.
2.4 记录结果
Sacred 提供了记录结果的方法.
1
2
3
4
@ex.capture
def some_function(_run):
    loss = 0.001
    _run.log_scalar('loss', float(loss), step=1)
2.4.1 捕获标准输出
Sacred 默认是可以捕获标准输出的, 但是如果用到的 tqdm 之类的进度条时, 需要过滤一些参数:
1
ex.captured_out_filter = apply_backspaces_and_linefeeds
此外, 由于 Sacred 0.8.1 版本的 bug (更新: 0.8.2 的版本已解决), 还需要修改一处源码:
1
2
3
4
# 默认环境中的位置
vim ~/miniconda3/lib/python3.7/site-packages/sacred/stdout_capturing.py
# 虚拟环境中的位置
vim ~/miniconda3/env/torch/lib/python3.7/site-packages/sacred/stdout_capturing.py
第 119 行:
1
2
3
with NamedTemporaryFile(mode="w+") as target:
# 修改为
with NamedTemporaryFile(mode="w+", newline='') as target:
2.5 观察器
Sacred 提供了非常丰富的观察器用于记录实验数据, 包括 MongoDB, FileStorage, TinyDB, SQL, S3, Slack, Telegram, Neptune等. 我们主要介绍 MongoDB.
使用 MongoDB 需要第三方的支持. 首先安装 pymongo 库来支持数据库连接:
1
pip install pymongo
然后需要在服务器上安装 MongoDB 数据库软件. MongoDB安装教程
接下来可以在程序中预先添加好 MongoDB 观察器, 也可以在运行时临时指定.
- 临时指定数据库
1
2
python demo.py -m HOST:PORT:DB_NAME
python demo.py -m localhost:27017:name
- 在代码中指定数据库
1
2
3
from sacred.observers import MongoObserver

ex.observers.append(MongoObserver(url="localhost:27017", db_name=name))
Sacred 运行实验时如果使用 MongoDB 观察器, 那么 MongoDB 是以 ID 作为实验的主键的, 从 1 开始编号, 每次运行实验都会递增 ID. 获取本次实验 _id 的方式:
1
2
3
@ex.capture
def some_function(_run):
    print(_run._id)
2.6 配料 (Ingredient)
Sacred 提供了一种代码模块化的机制——Ingredient, 其作用是把实验的配置模块化, 从而实现不同模块(和配置)的方便组合. 先看一个模块化数据加载的例子:
1
2
3
4
5
6
7
8
9
10
11
12
13
14
15
16
import numpy as np
from sacred import Ingredient

data_ingredient = Ingredient('data')

@data_ingredient.config
def cfg():
    filename = 'my_dataset.npy'
    normalize = True

@data_ingredient.capture
def load_data(filename, normalize):
    data = np.load(filename)
    if normalize:
        data -= np.mean(data)
    return data
这样我们就把和数据加载有关的配置全部装进了 data_ingredient 中, 它的名称为 data .
接下来我们把配料 data_ingredient 引入主脚本, 并加入 Experiment 的 ingredients 参数的列表中.
1
2
3
4
5
6
7
8
9
10
11
12
13
from sacred import Experiment
from dataset_ingredient import data_ingredient, load_data
from utils import Map

ex = Experiment('my_experiment', ingredients=[data_ingredient])

@ex.automain
def run(_config):
    cfg = Map(_config)
    data = load_data()  # 直接调用函数而无需参数 (参数由 Sacred 注入)
    # 获取参数
    print(cfg.data.filename)
    print(cfg.data.normalize)
配料也可以拥有自己的命令:
1
2
3
@data_ingredient.command
def stats():
    print("Status: 123")
运行时用 . 来调用:
1
2
3
python demo.py data.stats

# Status: 123
配料可以进一步嵌套:
1
data_ingredient = Ingredient('data', ingredients=[my_subingredient])
在捕获函数中获取配料的参数:
1
2
3
4
@ex.capture
def some_function(data):   # 配料的名称
    if dataset['normalize']:
        print("Dataset was normalized")
2.7 Omniboard 可视化工具
Sacred 仅提供了数据写入数据库的功能, 如 MongoDB, 而一些第三方工具可以可视化数据库中的工具. Omniboard 是特别针对 Sacred 写入 MongoDB 的数据来设计的可视化工具.